
Diamond Painting: the best of indoor hobbies
Sticking to one activity for a longer time is hard for everyone unless it is their passion or profession. Exploring new ideas to run through the time in interesting ways, Diamond painting is one of the best amongst hobbies, grabbing more attention and allowing the growing ups to use the winters in some colorful activities.
Parents can get their hands on the diamond painting kits to engage the kids in functionality and provide them with one of the novel hobbies that impart positivity to their personalities. Because it is proved that in diamond painting, the focus on one point increases and brain & body work in perfect coordination.
Diamond painting is a creative way of projecting artistic sense in amateurs and work as relaxant for the stressed minds. From kids above the age of 8 to the grownups who are retired from their practical lives, it is not safe to wander around and bear the intensity of weather and circumstances, diamond painting kits are a perfect outlet for admiring their activities in their leisure time staying at home.
Why do we call it Diamond Painting?
Following the parameters of paint by numbers and old-age cross stitch or the mosaic art, it works the same as them. But instead of paint, small sized resins are used to fill in the squares that are pre-marked on the canvas. Any image or template is printed on the canvas with the help of little boxes and each box is coded with a number. Packs of resins are provided with corresponding codes that have to be placed on the boxes. That is how a picture gets to the completion and this is the reason it is called Diamond Painting.
Q. Does Diamond Painting have other names?
Ans. Yes, it goes by different names so don’t get confused. It is also called:
- Paint with diamonds
- Diamond Dots
- DIY Diamond Painting
- 3D diamond painting
- 5D diamond painting
- Cross-stitch Diamond Painting
Unbox the Kit
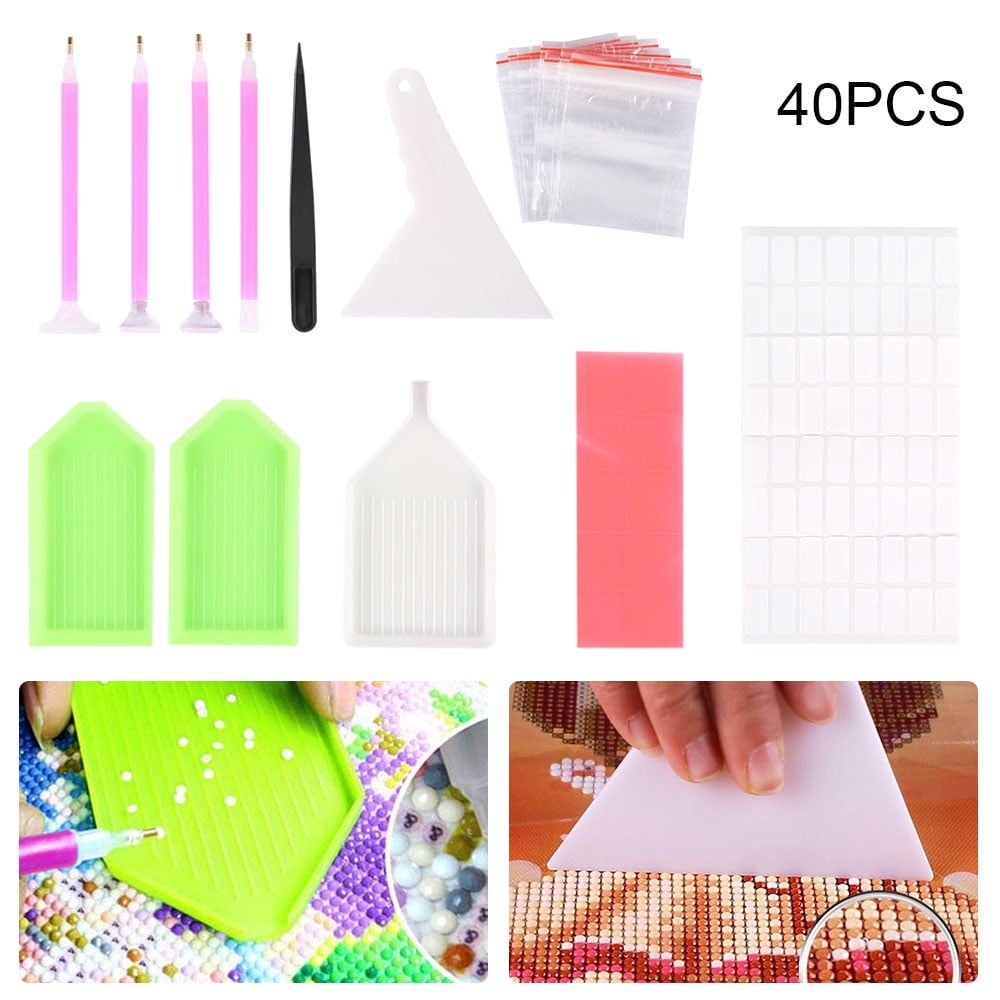
First of all, unbox the package and check all the items are included in the box that you ordered… Make sure you got all the tools that would be used in the process. Check packs of resins, the rolled canvas, wax bar and the diamond applicator, all the objects are good to use.
Technique: Put all the things in order to avoid messing and missing the objects. Make use of the inventory list to tally the resins with the list.
Tip: Use a storage box to keep little resins from spilling or losing.
Smooth the canvas
Smooth the canvas by unrolling it on a flat surface table or floor and minutely look at the grid pattern and symbols whether they are perfectly printed and not missing any details. You can find a chart with DMC codes and corresponding drill colors at the side margins of the canvas. Make an understanding of the DMC codes and their correlation with the colored drills to get a smooth going in work.
Technique: To smooth the canvas, flat it and put four corners under some pressure i.e.-e use books or paper weight to avoid the canvas rolling back. You can use a double-sided tape for fixing the corners.
Tip: Use a study table as a flat surface. The slope of the table will prevent from wrong posturing.
Spill the drills
Choose the color and area from where you are going to start and spill the corresponding color drill into the grooved tray for easy access and quick working.
Technique: Shake the tray back and forth to adjust the drills with flat surface downward.
Tip: To disjoin the clumped drills, use tweezers.
Peel the plastic film cover
Now when you are ready to start, make sure that starting point would lead you to easy finishing. Some people prefer to work from down to upward. Peel the protective plastic film from the corner of the canvas. This plastic sheet protects the canvas from dust, damages and fading the codes.
Technique: Always start from the corner of the canvas and peel a little part of the sheet. Complete it first and then move forward by splitting the plastic cover and filling it with drills.
Tip: Start from top to down. It helps in smooth running of the work.
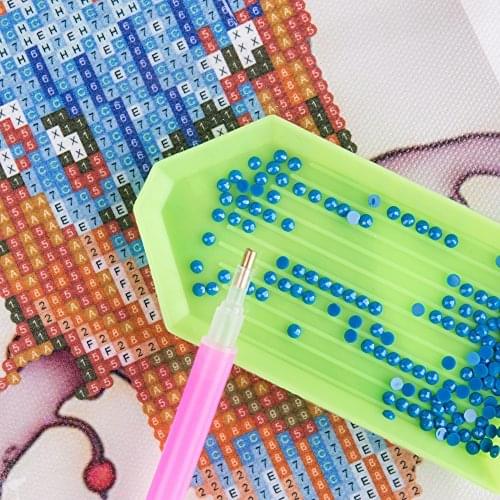
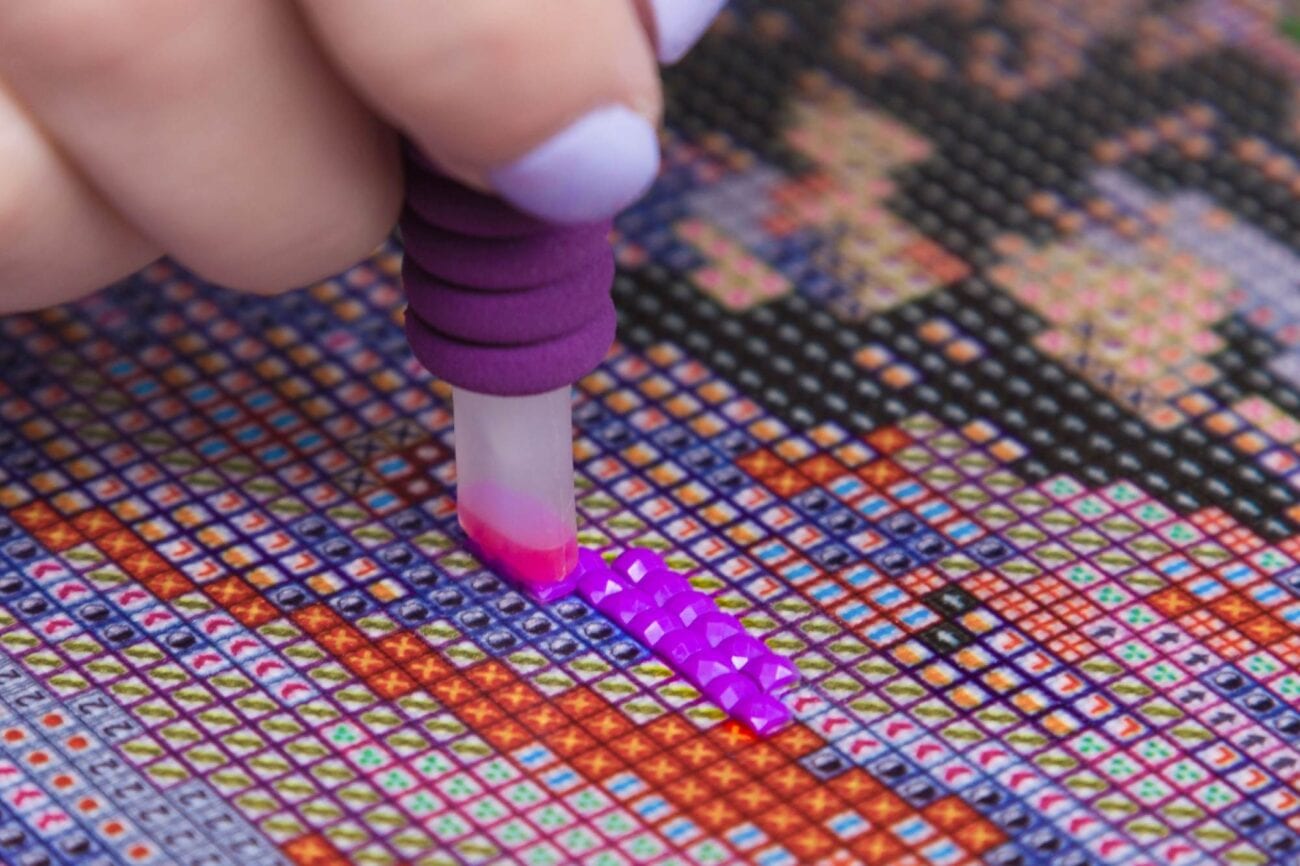
Pick up the drills
At this step, when you have stripped off the protective film, pick the diamond applicator and press its tip on the top of the diamond, it will get stuck to the tip. Now place the diamond on the coded section one by one and get the image arranged in the way.
If you find that the diamonds are not sticking to the diamond applicator, use the wax bar that is given in the package. Rub it on the tip and then repeat the order mentioned above to pick and place the diamond. You don’t have to rub the wax every time; one time is enough for the next five to six rounds.
Technique: Sometimes, when you place the drill with more pressure, the glue pressed out and spread on the edges of the drill. It dims the shine of the drill. To avoid the situation, press little when placing the drill.
Tip: If you want to complete the work quickly, use a multi-head applicator. It will help in placing more than one diamond in each move.
Complete the canvas
Repeat the action of picking and placing the diamonds until you find the canvas is filled with all the drills in accordance with the DMC codes. Some canvas comes with large backgrounds of the same color drills; it becomes tedious to fill the wide places with repetitive moves and colors. Use these techniques to avoid boredom:
Technique
Use chess board technique: place diamond with one gap and then turn back with filling the missing ones
Farm a plot: it is very satisfying. Create a square by placing an outline of drills and then fill in the box with the use of a multi-head pen.
Tip: During the process, if some areas get dried use baby wipes or wet cloth and gently dab on the dries part. The adhesiveness will recover and the drills will stick with same efficiency.
Put some pressure to fix the drills
After completion, place the canvas under some weight to get the canvas flat and fixation of drills.
Tip: Put it under the mattress or place heavy books on the top of the canvas for achieving the purpose.
Hang it on the wall
You spent long hours making a unique piece of art, how could you leave it in stores unattended and unappreciated?
Frame your masterpiece and hang it on the wall where you feel it suits. No doubt, it is worth the applause you will receive.
Use a roller pin to adjust the drills
When you have completed your diamond painting, fix the film cover on the canvas and roller a wooden or plastic roller pin on the canvas with little pressure to fix the drill with more force in their places. It will bleed the air gaps and will help in holding the canvas firmly. It will also enhance their lifetime by preventing the drills from falling or leaving their place.
se tweezers to adjust the wrongly placed drill
By mistake, if any drill is placed in the wrong square, pick it with the help of tweezers and place it rightly. Some crafters feel ease to use the tweezers at first place for picking and placing the drills.
Use a scraper to adjust the drills
It happens some time that drills do not follow the straight line and slip a bit leaving the actual place. Ro tackle the situation, use a scraper to eject and fix the drills in a straight line.
Our suggestions
While arranging information in this article, our sole purpose was to guide you as much as you feel easy in doing your artwork. We adorn each section with ample amounts of counseling and enrich it with tip & tricks to save your time and effort.
In the last section, we feel pleasure suggesting you a few things that would be an incentive for the beginners to come forth and prove their skills.
- Although, the bigger the better is the true notion but Order a small canvas if you are ordering for the first time and polish your skill before attempting on a big canvas.
- We don’t supervise square drills over round drills, but if you want a fuller snap. Then we recommend square drills to get a picture without gaps.
- All the kits comes with basic tools;
- A canvas
- Drills
- Wax bar
- Applicator
- Always buy diamond painting kits from your trusted websites to avoid any frauds or damage packages.